Getting Started with Seltzr and Entity Framework Core
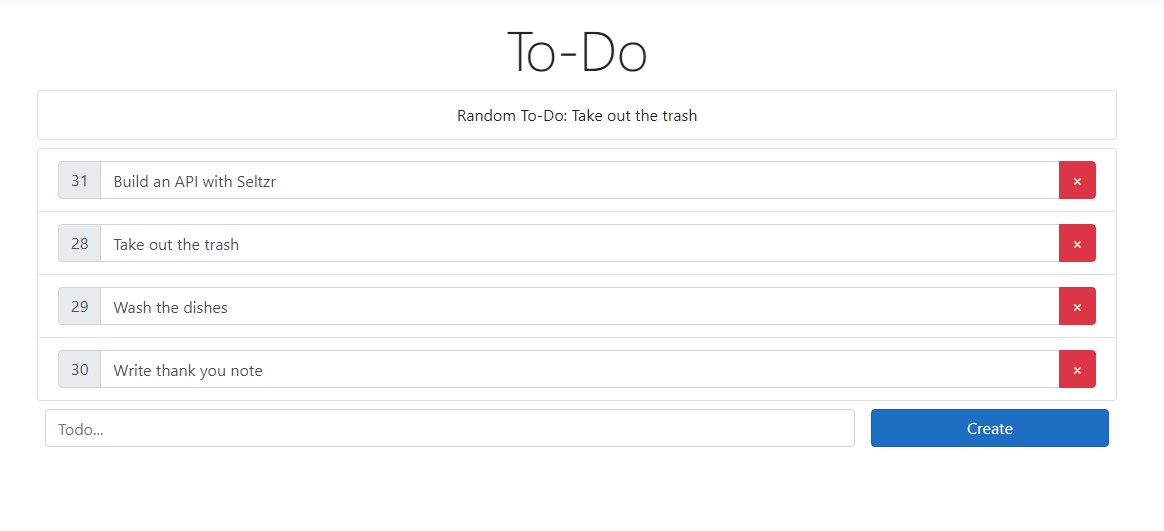
In this getting started example, we'll be building a simple to-do app. When you're finished, you'll be able to use a web interface to create, read, update, and delete from a to-do list:
Terminology
- Definitions of the technical terms used in this article are listed below:
- API: Every call to some form of
app.UseSeltzris an "API," a set of routes bundled together for working with a specific model. - Model: The data class that the API operates on. In Entity Framework, this is also referred to as an Entity.
- Route: A bundle of everything that makes up a request with a single associated route pattern: parsers, filters, etc.
- Route Pattern: The string pattern that determines whether an HTTP request path matches a route
- API: Every call to some form of
Prerequisites
- Visual Studio with .NET Core (Windows) or Visual Studio Code and the .NET Core SDK (Windows, Mac, Linux)
- A good knowledge of ASP.NET Core and Entity Framework is recommended, but not required.
Creating a new Project
- Create a new ASP.NET Core project in Visual Studio, or on the command line.
- From the Start Page, click on Create a new project
- Click on or search for ASP.NET Core Web Application
- Enter a suitable project name, like SeltzrGetStarted
- Click Create
- When prompted, choose the Web Application template
Installing Dependencies
- Next, install the
Seltzr.EntityFrameworkCorenuget package, as well as the Entity Framework package for Sqlite:Microsoft.EntityFrameworkCore.Sqlite.
- From the toolbar, select Tools > NuGet Package Manager > Package Manager Console
- Enter the following commands in the Package Manager Console:
Install-Package Microsoft.EntityFrameworkCore.Sqlite
Install-Package Seltzr.EntityFrameworkCore
- Once you've installed the packages, build the project (
Ctrl+Shift+Bordotnet build) to make sure they installed properly.
Creating the Web Interface
HTML
- To create the web interface, start by replacing the code in Pages/Index.cshtml with the following:
@page
@model IndexModel
@{
    ViewData["Title"] = "Todo";
}

<div class="text-center">
    <h1 class="display-4">To-Do</h1>
    <section id="todo-container" class="col">
        <ul id="todo-list" class="list-group"></ul>
        <div class="row m-0">
            <input type="text" class="form-control col-9 m-2" placeholder="Todo..." id="new-todo">
            <button type="button" class="btn btn-primary col m-2" id="create-btn">Create</button>
        </div>
    </section>
</div>
- This code:
- Creates a container for todo items
- Creates a text input and button for creating new todo items
Javascript
- Next, replace the code in wwwroot/js/site.js with the following:
async function getTodos() {
    let response = await fetch("/todos");
    if (response.status !== 200) throw new Error(response.text());
    let todos = await response.json();
    document.getElementById("todo-list").innerHTML = "";
    todos.forEach(t => {
        document.getElementById("todo-list").appendChild(createTodoItem(t))
    });
}

function createTodo(text) {
    return fetch("/todos", {
        body: JSON.stringify({ Text: text }),
        headers: { "Content-Type": "application/json" },
        method: "POST"
    });
}

function deleteTodo(id) {
    return fetch(`/todos/${id}`, {
        method: "DELETE"
    }).then(getTodos);
}

async function updateTodo(id, text) {
    return fetch(`/todos/${id}`, {
        method: "PATCH",
        body: JSON.stringify({ Text: text }),
        headers: { "Content-Type": "application/json" }
    });
}

function onKeyDown(id, e) {
    if (e.keyCode == 13) updateTodo(id, this.value).then(r => {
        this.style.transition = "background-color 150ms ease";
        this.style.backgroundColor = r.status == 200 ? "#bae0ff" : "#ffc3be";
        setTimeout(() => { this.style.backgroundColor = ""; setTimeout(getTodos, 75); }, 75);
    });
}

function createTodoItem(todo) {
    let newEl = (name, attrs) => { let el = document.createElement(name); for (key in attrs) el[key] = attrs[key]; return el };
    let root = newEl("li", { className: "list-group-item" });
    let inputGroup = newEl("div", { className: "input-group"});
    let prepend = newEl("div", { className: "input-group-prepend" });
    let idText = newEl("span", { className: "input-group-text", title: new Date(todo.Created).toLocaleString() });
    idText.appendChild(document.createTextNode(todo.Id));
    let input = newEl("input", {type: "text", className: "form-control", value: todo.Text });
    input.onkeyup = onKeyDown.bind(input, todo.Id);
    let append = newEl("div", { className: "input-group-append" })
    let deleteBtn = newEl("div", { className: "btn btn-danger", innerHTML: "\u00D7", onclick: deleteTodo.bind(null, todo.Id) })

    root.appendChild(inputGroup);
    inputGroup.appendChild(prepend);
    prepend.appendChild(idText);
    inputGroup.appendChild(input);
    append.appendChild(deleteBtn);
    inputGroup.appendChild(append);
    return root;
}

document.getElementById("create-btn").addEventListener("click", () => {
    let input = document.getElementById("new-todo");
    createTodo(input.value).then(async r => r.status == 200 || alert("Couldn't create todo: " + await r.text())).then(getTodos);
    input.value = "";
});
getTodos().catch(e => alert("Couldn't GET /todos:" + e));
- This code:
- Sets up requests to create, read, update, and delete todo items
- Sets up an event listener on todo items to update them
- Adds a method for rendering todo items on the page
- Sets up an event listener on the create button to create new todos
Creating the Todo Model
- In the root directory of your project, create a file called Todo.cs and create the
Todomodel class, which defines a primary keyId, a valueText, and a creation dateCreated.
using System;

namespace SeltzrGetStarted {
    public class Todo {
        public int Id { get; set; }

        public string Text { get; set; }

        public DateTime Created { get; set; }
    }
}
- Next, define the database context for our
Todoitems:
using Microsoft.EntityFrameworkCore;

namespace SeltzrGetStarted {
    public class TodoContext : DbContext {
        public DbSet<Todo> Todos { get; set; }

        protected override void OnConfiguring(DbContextOptionsBuilder options)
            => options.UseSqlite("Data Source=todo.db");
    }
}
- Finally, create the
Todotable in the database using EF Core tools:
In the Package Manager Console, run the following:
Install-Package Microsoft.EntityFrameworkCore.Tools
Add-Migration InitialCreate
Update-Database
For more details on what these commands are doing, refer to EF Core's getting started guide
Building the API
- If you try to run the project now, you'll get errors because the webpage can't connect to the API. Let's fix that.
- Register the database context in Startup.cs so that Seltzr can use it.
public void ConfigureServices(IServiceCollection services) {
   services.AddRazorPages();
   services.AddDbContext<TodoContext>();
}
- Import Seltzr and initialize it at the end of
Configureusing the extension method AddEFCoreSeltzr(String, Action<SeltzrOptionsBuilder>)
using Seltzr.Extensions;
public void Configure(IApplicationBuilder app, IWebHostEnvironment env) {
    ...
    app.AddEFCoreSeltzr<Todo, TodoContext>("todos", api => { });
}
- The above code:
- Creates a new API with a base route pattern of "todos/". All other routes created for this API will start with "todos/"
- Defines a callback that takes in a SeltzrOptionsBuilder for setting options and creating child routes for this API.
Adding options
- Add some options to the API that affect all routes.
app.AddEFCoreSeltzr<Todo, TodoContext>("todos", api => {
    api
        .ParseJson()
        .WriteJson()
        .CatchExceptions();
});
- The above code:
- Sets the API up to parse HTTP request bodies in the JSON format. See Also: Parsing
- Sets the API up to return all responses in the JSON format. See Also: Result Writers
- Adds an Exception Handler so that unhandled exceptions are caught and returned in the API response.
Declaring routes
- Declare four routes on the API for working with
Todoitems.
app.AddEFCoreSeltzr<Todo, TodoContext>("todos", api => {
    api
        .ParseJson()
        .WriteJson()
        .CatchExceptions()
        .Get()
        .DeleteByPrimaryKey()
        .PatchUpdateByPrimaryKey()
        .PostCreate();
});
- The above code:
- Creates four new routes
- The first, Get(), defines a
GETrequest that will return all of theTodoitems in the database - DeleteByPrimaryKey() defines a
DELETErequest that will accept a value forIdat the end of the route pattern (e.g./todos/4) and delete the matchingTodo - PatchUpdateByPrimaryKey() defines a
PATCHrequest that similarly accepts a value forIdand updates theTodousing the values provided in the request body. - PostCreate() defines a
POSTrequest that accepts a JSON request body and creates a newTodo
Note
Those four methods aren't the only ones that create routes. See Routing for a comprehensive list.
Run the app
- With all four routes defined, run the app by hitting the play button in Visual Studio or executing
dotnet runin a terminal. - If a browser doesn't open automatically, open one and browse to the link output in the console.
- When the website loads, use the field at the bottom of the page to type in a new todo item and hit Create.
- A new todo item should be created and displayed alongside its
Idabove the text field. Try entering new text into the displayed item and hittingEnter. A blue flash indicates that the todo item has been updated. - Hitting the red
Xwill delete the todo item. - Hovering over the
Idwill display the creation date for the todo item. There's no logic to set that yet, however, so it will display a placeholder value.
Note
Any any point when you're running the app, hit Ctrl+Shift+I (Cmd+Shift+I on MacOS) and click on the Network tab in the window that appears to observe the raw network requests and responses from the API.
Extending the API
- Though the simple API works fine, these next steps cover some nice features you can add to polish it off.
Sorting the Todo Items
- Use the OrderBy method to sort the todo items alphabetically by their
Textproperty:
app.AddEFCoreSeltzr<Todo, TodoContext>("todos", api => {
    api
        .ParseJson()
        .WriteJson()
        .CatchExceptions()
        .OrderBy(t => t.Text)
        .Get()
        .DeleteByPrimaryKey()
        .PatchUpdateByPrimaryKey()
        .PostCreate();
});
- Under the hood, this method adds a Filter to the route. A filter is anything that modifies the dataset, even if it doesn't actually "filter" models out.
- Run the app and create a new todo item. It should be inserted alphabetically into the todo list.
Requiring Non-Empty Input
- Currently, when creating or updating a todo item, empty or whitespace-only text is accepted as a valid value for the item. Use the <xref:Seltzr.Options.Builder.SeltzrOptionsBuilder`2.RequireAllInput(System.Func{`0,System.Boolean})> method to prevent this.
app.AddEFCoreSeltzr<Todo, TodoContext>("todos", api => {
    api
        .ParseJson()
        .WriteJson()
        .CatchExceptions()
        .OrderBy(t => t.Text)
        .RequireAllInput(t => !string.IsNullOrWhiteSpace(t.Text))
        .Get()
        .DeleteByPrimaryKey()
        .PatchUpdateByPrimaryKey()
        .PostCreate();
});
- This method creates a Condition that requires the input text to not be null or whitespace.
- Run the app.
- Create an empty todo. An error should appear.
- Updating an existing todo with whitespace. A red flash and no change should occur.
Warning
Try putting the call to RequireAllInput at the end of the chain, after PostCreate. You'll notice it's possible to create empty todo items again. Why? Calls to Seltzr's options builder only apply to all future routes (methods like Get() and DeleteByPrimaryKey() are what create routes), any previous routes don't have those options applied to them.
Tip
Try adding .ForEachInput(t => t.Text = t.Text.Trim()) to also trim any excess whitespace from the ends of the todo item.
Setting a creation date
- Every method that creates a route, like
Get()andPostCreate()also accepts an options handler of its own which can be used to set up additional options that only apply to that route. Use it here to default theCreatedproperty onTodoto the current date and time.
app.AddEFCoreSeltzr<Todo, TodoContext>("todos", api => {
    api
        .ParseJson()
        .WriteJson()
        .CatchExceptions()
        .OrderBy(t => t.Text)
        .RequireAllInput(t => !string.IsNullOrWhiteSpace(t.Text))
        .Get()
        .DeleteByPrimaryKey()
        .PatchUpdateByPrimaryKey()
        .PostCreate(create => {
            create.Default(p => p.Created, () => DateTime.Now);
        });
});
- The Default method customizes the body parser to set a value for a property if none is provided in the request body.
- Run the app and create a new todo item.
- Hovering over the ID for that todo should display the creation date.
Tip
With Created initialized, try updating the OrderBy method to OrderByDescending and sorting by Created instead.
Note
Even though the website doesn't, an HTTP POST request to /todos can still provide the Created property. To force Created to always be set to DateTime.Now, use Default() in conjunction with Ignore to ignore the Created property on any request body.
Getting a random Todo
- Define a new route that uses Filter to perform an advanced operation.
- To avoid colliding with the existing
GETrequest, define this route on the/todos/randomroute pattern.
app.AddEFCoreSeltzr<Todo, TodoContext>("todos", api => {
    api
        .ParseJson()
        .WriteJson()
        .CatchExceptions()
        .OrderBy(t => t.Text)
        .RequireAllInput(t => !string.IsNullOrWhiteSpace(t.Text))
        .Get()
        .Get("/random", random => {
            random.Filter(d => d.Skip(new Random().Next(0, d.Count())).Take(1));
        })
        .DeleteByPrimaryKey()
        .PatchUpdateByPrimaryKey()
        .PostCreate(create => {
            create.Default(p => p.Created, () => DateTime.Now);
        });
});
Note
Though a working example for this guide, it's probably not a good idea to declare a new Random() on every request in practice.
- To make use of this new route, update the website:
<div class="text-center">
    <h1 class="display-4">To-Do</h1>
    <section id="todo-container" class="col">
        <ul class="list-group mb-2">
            <li class="list-group-item">Random To-Do: <span id="random-todo"></span></li>
        </ul>
        <ul id="todo-list" class="list-group"></ul>
        <div class="row m-0">
            <input type="text" class="form-control col-9 m-2" placeholder="Todo..." id="new-todo">
            <button type="button" class="btn btn-primary col m-2" id="create-btn">Create</button>
        </div>
    </section>
</div>
// add to the end of the file
fetch("/todos/random").then(r => r.json().then(todos =>
    document.getElementById("random-todo").appendChild(document.createTextNode(todos[0].Text))
));
- Run the app. A random todo item should appear at the top of the page.
- Additionally, try browsing to
/todos/random. You should see a random todo item returned in a JSON array.
Note
Why does /todos/random return an array? Seltzr won't make assumptions that a route will always return a single element, even if it is always true. In fact, a GET request to /todos/random will return an empty array if there are no todo items. To make this route behave more like a traditional API and always return a single element, use the <xref:Seltzr.Options.Builder.SeltzrOptionsBuilder`2.RequireExactlyOne> and StripArrayIfSingleResult(Boolean) methods alongside Filter.
Summary
- In this guide, you learned how to:
- Setup a basic REST API with Seltzr.
- Create routes using the
Get,PostCreate,PatchUpdateByPrimaryKey, andDeleteByPrimaryKeymethods. - Use filters and conditions to extend the API.
- Create route-specific options by providing a callback to a route-creating method.